Emulation is the recreation of a system in enough detail and with enough accuracy that software designed for that system can run on an entirely different system by way of that emulator. In other words it's a piece of software that runs on one computer to let you run software designed for a different computer. But I think it is more than that, I consider emulation to be a form of digital preservation; emulators preserve the experience of older machines that are no longer produced or are difficult to find in working order.
Related Posts
I can imagine a time when the computers of days gone by have all suffered component failure and there are no replacements. For example, there are only a limited number of AY-3-8910 programmable sound generator ICs left, once they're gone they're gone and no one will be making any more of them. That makes emulation important, those chips would be lost forever and the machines that depend on them would be lost as well. I wonder how many Super Nintendos or Atari 2600s will be working in 50 years?
Chances are you have played some games from the 80s or 90s that you may not have been able to play without emulation. Having said that, creating an emulator is not a simple task that can be undertaken in an afternoon. It takes a lot of work, depending on the complexity of the system it may take months, years or even decades to achieve the desired compatibility!
The Nintendo Entertainment System (NES, Famicom in Japan) was a video game system from the early-mid 80s for which a number of emulators exist, included FCEUX and puNES. However, achieving 100% accuracy is a difficult task due to complexity of the interactions between the subsystem in the NES. The Picture Processing Unit (PPU), which handles drawing to the screen, requires accurate timing to emulate some visual effects - for example, split-screen scrolling.
Low-level vs. High-level Emulation
There are a few different types of emulators around today, and they broadly fall in to one of two categories - low level emulators and high level emulators. Low level emulators (LLE) try to recreate the hardware of the machine being emulated, and generally have better accuracy and compatibility. High level emulators (HLE) try to avoid emulating the hardware directly and abstract some of it away, their purpose is not to create a 100% cycle accurate emulation of the machine but to recreate the functionality such that original software will run reasonably well.
Practical emulation of more modern systems, the Dolphin Nintendo Wii emulator for example, is only possible with the use of both LLE and HLE. LLE will generally be more accurate and more compatible, but comes at the cost of being more power hungry, requiring faster CPUs to run at full speed.
This excellent Ars Technica article should give you an idea of the difference accuracy can make, Accuracy takes power: one man’s 3GHz quest to build a perfect SNES emulator . While I agree with a lot of what byuu writes, I would not start out by writing a cycle accurate emulator, however this is something I would attempt later.
Writing an emulator
First we need to decide what to emulate. It's a tough choice, there are a lot of interesting machines out there. I want to write an emulator that emulates something fun, but is simple enough that it will make a good learning example for myself. The usual starting point people suggest for your first emulator is CHIP-8, a simple interpreted programming language designed in the 70s. CHIP-8 programs are run inside a virtual machine that is quite straightforward and well defined which makes it a good example for learning about virtual machines and emulation. However, it lacks the nostalgic retro-factor of other machines, at least for me.
The second generation of video game consoles that came out in the late 70s/early 80s were the first to use microprocessors for their game logic, rather than the first generation's discrete transistor based game logic. They also had ROM cartridges, which made it much cheaper and easier to make different games - all you had to do was program a new one. The second generation consoles all use 8-bit microprocessor and include the Atari 2600 , Intellivision , and the unusual Vectrex . The Atari 2600 and Intellivision were popular machines - the Atari 2600 selling over 30 million units (over its 15 year life) and the Intellivision selling 3 million.
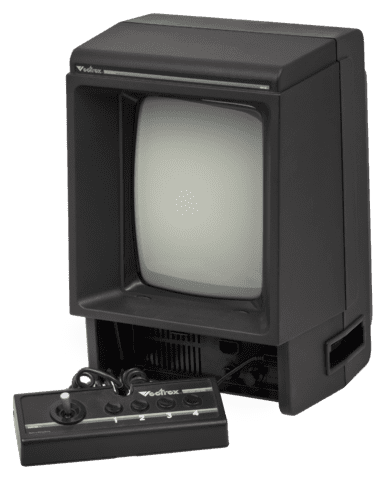
The Vectrex was released in 1982 by GCE (later Milton Bradley Company), and was designed by Smith Engineering/Western Technologies. The Vectrex is unusual for home consoles because, first, it came with a display built-in and, second, it's a vector display.
A vector display is different from a regular raster display, like your TV - a vector display draws lines instead of pixels which means you can have very clean lines with no pixelation, however you can only draw lines (or points)
There is a lot of choice available for systems to emulate, but I have decided to write an emulator for the Vectrex.

Vectrex-Console-Set by Evan-Amos CC BY-SA 3.0 , via Wikimedia Commons .
It's a simple enough machine that it should be relatively straightforward to emulate and there is enough information online that I don't have to get one of the machines and take it apart to work it out (I'll save that for another day.) Some time ago Smith Engineering graciously released all of the Vectrex material in to the public domain, which also makes it a great candidate for an emulator as there should be no legal issues - as long as it's not for profit. The homebrew scene for Vectrex is still alive and kicking, which means there are still new games being made by dedicated fans :-)
Vectrex!
This series of blog posts will be made up of a number of parts, this is the first part and it will be an introduction to emulation, the Vectrex and its hardware.
To start writing the emulator I first need to find all the information I can about the inner workings of the Vectrex. Luckily we live in a time where you can find anything you could want to know on the internet. Wikipedia might be a good starting point, but it will only give the basic information - like the CPU, amount of RAM, sound chip, IO chip, graphics etc.
CPU: Motorola 68A09 @ 1.5 MHz
RAM: 1 kB (two 4-bit 2114 chips)
ROM: 8 kB (one 8-bit 2363 chip)
Cartridge ROM: 32 kB
MOS 6522 Versatile Interface Adapter (VIA)
Sound: General Instrument AY-3-8912
Source: https://en.wikipedia.org/wiki/Vectrex
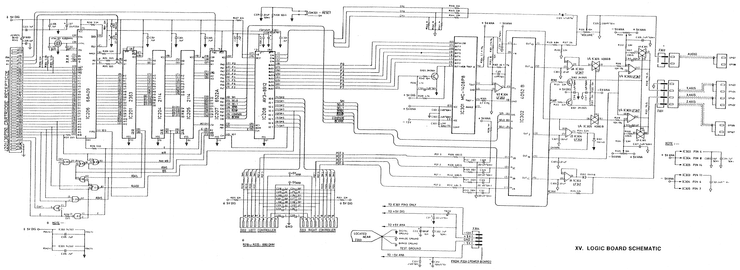
After the basics I need to start looking for some more specific information. To emulate a system with enough accuracy to run software written for it requires a lot of detailed information about the internal components of the machine - luckily the Vectrex is an old machine and a lot of research has already been done by other people. We can use that information to create our emulator; Keith Wilkins produced a document called "internal.txt" which has a few details about the Vectrex internals - it's a bit old but still useful, mostly for the information about the vector drawing circuitry. As all the Vectrex materials are public domain it's quite easy to find a copy of the service manual, which includes a schematic diagram of the Vectrex system.
There are 4 documents I will be using throughout the development of the Vectrex emulator; Keith Wilkins' "internal.txt", Frank Kontros' R6522 documentation, a document about the AY-3-8912 (I don't know who the author is), and the schematic diagram (see below) from the service manual. In addition to those there are several documents about the CPU that will be needed, but I'll cover those later.

From the schematic diagram we can see how all the components fit together. You can see the CPU, address decoding logic, RAM/ROM chips, 6522 VIA, and circuitry for the video, audio and input. The address decoding logic is the logic that allows the CPU to talk to the other ICs, the address lines are used to enable the other ICs. Wikipedia has a good article explaining address decoding , I recommend that you read that article if you are not familiar with address decoding. The address decoding leads to the memory map, which will be the basis of the emulator. The 6522 was a popular I/O interface chip in the 80s, it was made with the 6502 in mind. The 6522 provides timers, a shift register for serial communication. The AY-3-8910 is a 3 channel programmable sound generator (PSG), it was made by General Instrument. It was popular is arcade machines at the time and was used in a few consoles. The video is controlled by a digital to analog converter (DAC), which is fed by PORTA of the 6522, which also feeds in to the AY-3-8910. The DAC is also used for the joystick axis inputs, and the sound chip IO pins are used for the joystick buttons.
In the next post I will setup my project and start writing some code!